Whitelist Campaign Case Study in the Adult Vertical

 8 min read

You are currently in the "Adult" - Learning paths

1
adult niche in affiliate marketing
Adult Niche: The Gold Mine in Affiliate Marketing

6 min read

2

dayparting
Adult Ad Networks Analysis (Pros and Cons)

14 min read

3
create a campaign on exoclick
How to Create a Killer Mobile Campaign on ExoClick

9 min read

4
exoclick smartcpm
How to Effectively Use the SmartCPM Tool on ExoClick

6 min read

5
Whitelist Campaign Case Study in the Adult Vertical

8 min read

6
A Premium Campaign Case Study on ExoClick

7 min read

7

What is a Popunder Ad & How to Use It
What is a Popunder Ad & How to Use It (Explained)

11 min read

8
best adult wordpress themes
Best Adult WordPress Themes for Tubes and Blogs

13 min read

Advertisement

Introduction

Whether you’re a beginner or an affiliate marketing master, you probably heard about and have used the feature that’s the main focus of this article:

Whitelist campaigns.

Even so, I know you can always improve your skills and learn even more!

That’s the reason why I’m gonna give you the chance to take a look at this awesome case study!

Ready? Fasten your seat belts!

Let’s go forward and start our journey – one that’ll be of great value to experts and newbies alike.

As usual, let’s start in the best way possible:

Right from the beginning.

What’s a Whitelist?

In case you feel you don’t quite know what the term is all about, it’d be great for you to check an article about whitelists where you’ll find everything you need to know.

Just a quick reminder: whitelists are born from data gathered from your campaign’s placements.

Let’s say that – from hundreds or even thousands of placements that’ll be targeted at the beginning – you probably will start noticing that some convert like crazy and others disappoint.

What to do? I know you’ve been able to guess correctly!

You launch a cool whitelist campaign containing only those good websites you can count on.

Before I start exploring the actual case study, I’d like to point out the parameters that indicate that a particular placement is “whitelist material”.

For a website to be labelled as such, it has to present a good overall performance, which depends on several parameters.

Wondering which ones?

The first one is obvious:

Conversions.

However, it’s hard to define what is or isn’t a reasonable number of conversions, given the delimited timeframe, and the fact that conversion numbers vary wildly from segment to segment.

For instance, for a website in India or Thailand to have 3 conversions in, let’s say, 5 days, is probably not a good indicator.

Why?

Because these countries have huge volumes!

Now let’s imagine the same would be true for Switzerland or Belgium.

Now that’s what I call a pretty good sign!

Other major factors to be taken into consideration are CTR and, of course, the CPM, which will tell you how much you’re paying.

It can happen that a specific website is converting a lot but it’s very expensive and – even with a high number of signups – it’s not becoming profitable.

Last but not least, perhaps the most important parameter to be taken into consideration is the eCPA.

This metric mixes costs and signups, indicating how much you’re actually paying for each conversion.

Finally, something really important:

Regardless of the segment you’re working in, you’ve gotta be able to set some clear rules of thumb.

Why?

Because the main word you’ve gotta remember when dealing with whitelists is consistency.

Coherence. Stability.

You should not include websites that converted once in a lifetime and are likely to never convert again.

One of these rules, for example, can be to only include sites that converted at least 3 times in a reasonable time range with a very good eCPA.

This time range will depend on some parameters, especially GEO and spot.

Don’t worry!

Sooner, this info will be much more practical!

You’ll be able to check all these parameters and situations in the case study.

Ready to rumble?

Let’s go!

Okay.

Let’s present our star for this case study:

It’s a campaign in the adult vertical for Turkey, for the ad size 300×250, targeting just the browser Chrome and one operator.

This is an already segmented campaign which came from a RON with a wide target.

What happened was that Chrome converted but had lots of traffic and it was expensive.

In order to better handle it, I decided to split it into a different campaign.

The campaign was launched on May 24th.

You can check the first results below.

whitelist first results

Let’s analyse this for a little bit.

Was the campaign converting?

Check, as you can see in the G1 column.

Was it profitable?

Unfortunately, no.

Considering the payout in this segment was around 1€ at the time, you can see (by these eCPAs) that I was losing money since I was paying more than I was making per conversion.

Nonetheless, this was kind of expected.

Indeed, the Chrome browser wasn’t being profitable in the main campaign and that’s why it was taken out in the first place.

At this point, you can ask me, so why not just cut Chrome from the original campaign?

The answer is that this is something that depends on the knowledge you have of the segment.

If you know that a specific parameter is expensive, but it converts and could be worth it with lower costs or better targeting, you shouldn’t just cut it, but instead, try splitting it into a different campaign.

Alright, moving on.

So, this isn’t looking good.

What do we do now?

The first thing I did was to optimize this campaign, cutting expensive parameters.

As a result, my costs were decreasing, but my conversions also decreased, and the eCPAs were just as bad.

What now, then?

Is everything lost?

Is this promising campaign just a useless money drainer?

Not at all!

Now it’s time for you to become acquainted with this article’s hero:

A whitelist!

You’ve already been able to check that this campaign is converting quite well, right?

However, it continues to be expensive.

This is usually a textbook situation to create a whitelist.

The first thing you have to do to create a whitelist is taking a look at your placements.

In this specific case, you should look at your websites.

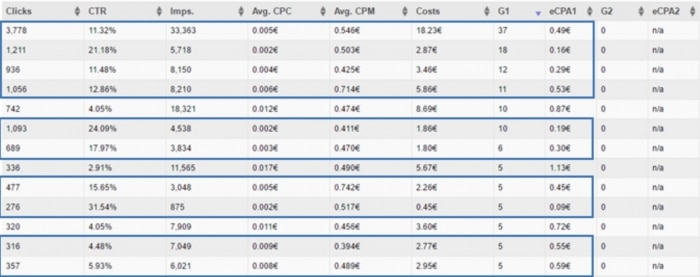
Let’s analyze:

whitelist website analysis

A good tip is to sort your websites by conversions.

This way, you can easily check which shall be the lucky ones that’ll end up on your whitelist.

You should also try to pick as long a period as you can, so as to have consistent data.

I have obviously selected the campaign’s whole life since it was a fairly new campaign.

It’s worth mentioning that, here, you see many good websites and are probably starting to ask yourself:

Why was this campaign negative when it has such good placements?

But remember, these are sorted by conversions.

This means that it’s normal that it shows the best websites first.

The main optimization I did was to cut expensive websites.

How to decide what “expensive websites” are all about?

You should sort by cost.

As you can see – although my campaign was losing money – I had many well-performing websites, with great eCPAs.

Considering the payout was around 1€, a placement such as the third one on the list, that converted 12 times and had an eCPA of 0.29€ is a pretty good website.

The next step was to select which websites were going to be added to my list.

Here is where you make use of those rules of thumb I alluded to.

This is when you’ll set your new campaign’s profile.

In this case — as we had many conversions and good placements — I opted to launch a very whitelist indeed.

What do I mean by that?

Bearing those high levels of consistency in mind, I just added the ones with a high number of conversions and considerably low eCPAs.

The chosen websites are highlighted in blue on the table above.

I could just as easily have included some placements with 2 or 3 conversions and very good eCPAs, but I chose not to, at the moment.

Again, these decisions are made because they serve the profile you want for your new campaign, and also due to the specific characteristics of the segment you’re working in.

Okay. So I selected the placements and cloned my campaign, with the same targeting, but just for these chosen websites.

Is there something missing?

Yes!

I have to set the bid for my new campaign.

How do I do that? I should put a bid that’s consistent with the eCPM of these placements.

In this case, you can see that the eCPAs are very good, so I had some leeway to do what I wanted.

Since I need to set a bid for all the websites in whitelists, calculating the eCPM of the one with the highest/worst eCPA is a good tip.

Why?

Because if the bid is good for this one, it will be good for all the others!

If you don’t know how to calculate eCPMs, don’t hesitate and read this academy article.

Yes! That’s what I’m talking about! My whitelist was ready to rock!

We’re just missing one last thing:

I have to decide whether or not I should keep the websites of the whitelist in the RON.

How do we make this decision?

Well, when you work with smart bidding, you’ve gotta be extra careful to not enter into competition with yourself, in these cases.

Cutting to the chase: you only leave the websites if there’s a considerable distance between the position you’re in the RON and in the whitelist.

This way, you could be getting two traffic profiles.

However, when in doubt, always remove the placements from the RON.

In this case, I removed all from the RON, especially because it was already quite expensive.

Wanna go straight to the fun part?

Let’s see its results in the first days.

Take a look:

ron campaign results

Now, this is beautiful to look at, right?

It already had an eCPA of 0.25€ on its first days. Look at these CTRs!

Nice. Is this it? Is everything perfect?

Bells are ringing, birds are singing, and money is pouring like it’s Wall Street?

No!

I still had to optimize this whitelist, cutting parameters that didn’t work well.

That’s what I did, even though there wasn’t much to cut since it already was a very segmented campaign.

The whitelist was inconsistent for about 4/5 more days.

Then, the money starting raining like it was monsoon season! In fact, around the 10th, it was all profits for the Media Buying kingpin!

What about now?

Is this the end of this success story?

Well, yes and no.

First, you obviously have to keep an eye on the campaign to see if the good performance continues consistently.

Moreover, you’ve gotta decide whether or not to keep the RON campaign active.

Ideally, you should keep the RON for as long as it makes sense to you.

Why? Because it can be great to keep feeding the whitelist with more good placements.

If the RON isn’t crazy expensive and is still converting, you should try keeping it active for a longer period of time.

That’s what I did. I included 2 more websites in the whitelist.

However, after a while, I didn’t want to spend more money in it.

I knew that it was gonna be increasingly hard for the campaign to keep on providing great placements.

I finally stopped it on the 15th of that month.

Remember:

Keep the RON while it continues to make sense to you.

If you manage to make it positive, even better!

Keep it permanently and you’ll see the money pile like a giant heap of heavy gold!

That’s it.

I hope you’ve enjoyed this case study.

My objective was simple:

I wanted you to be able to grasp the power of whitelists.

I’m sure that — after this article, and especially after you get your own great results with this tool — you too will be a believer that once you go white, you’ll be alright!

I wish you good luck!

Let’s get some awesome results with your whitelists!

Advertisement