A Step-By-Step Guide for Push Notification Ads
Last updated on September 12, 2025 14 min read
History of Push Notifications
Have you ever wondered how that cool notification message that pops up on your desktop or mobile device got there?
Technology moves fast.
And mobile technology trends are moving faster than ever.
So fast, in fact, that it’s sometimes difficult to imagine a world without the things that now so easily we take for granted.
We hardly ever stop to think of what it was like before.
A world before instant messaging.
A world before push notifications.
How did anyone get anything done?
And how did we ever manage to communicate with each other?
Things weren’t always this way.
Back in 2003, sending and receiving emails on your phone was a long and drawn out process.
First, you had to make a request to a remote server to check for new emails. Then, wait for the data to be sent to the client with the updates.
This presented a major problem for business users who often had to wait for long periods at a time to check their email.
Fortunately, the solution was not far off.
A company called Research in Motion (RIM), who developed the first line of Blackberry smartphones, was working on a solution that would revolutionize the way people used their devices.
The Push technology they came up with for Blackberry email offered a way to instantly send and receive emails to Blackberry devices, in real time.
This was a big deal, especially for business users, who flocked to the new technology in droves.
Built on its early successes, it wasn’t long before the email Push notification system was adapted for other use cases. Before long, Blackberry users were able to enjoy free texting between their devices using this new technology.
At the time, however, no one knew just how widespread the technology was destined to be.
Push technology was quick to be noticed by other brands in the mobile space, most notably Apple, who further built on the foundations of Push tech, when they developed the Apple Push Notification Service (APNS).
This enabled Push notifications to be sent to any installed app and was launched with their June 2009 iPhone iOS 3.0 release.
As revolutionary as Push technology was, this in itself was a stroke of genius, as it opened the floodgates for yet more use cases that extended far beyond the original vision of the technology.
Not to be outdone, Google soon threw their hat into the arena, and with the release of their Google Cloud to Device Messaging (C2DM) and Google Cloud Messaging (GCM), Android users now also had access to the same technology.
Within just a few years, various cross-platform solutions were created by third-party app developers, and Push notifications were extended to browsers (for desktop and mobile).
Mobile Push Notifications vs Desktop Push Notifications
So what’s the deal with desktop push notifications and how do these differ from mobile?
Push notifications run via web-based SDK which targets browser traffic.
So both mobile and desktop users receiving browser based notifications don’t require an app to be installed in order to receive a message.
This has the benefit of being able to target people who haven’t downloaded an app but comes at the expense of user personalization.
With mobile Push, there’s a world of engagement opportunities that desktop Push just doesn’t have.
Plus, mobile users can also receive push notifications via mobile web push which triggers in the browser on their device, giving them the best of both worlds. This accounts for the majority of push traffic, as an ever increasing number of people browse the web on their mobile device.
The message also displays differently to the user, depending on the device.
For desktop, you’ll typically see a browser level opt-in prompt when you visit a new site.
This makes it easy for users to opt-in, and once you give your consent to receiving new messages, you’re good to go!

Some sites will be more or less discreet with how they present this to you, but it’s more or less the same process: you give your permission to receive messages and notifications on your device and the technology does the rest.
Perhaps more important to mention is the similarity between the two delivery methods.
They both pop-up on your screen, both are instantaneous in their delivery and they won’t get caught in any spam filters active on your email accounts.
This makes them the perfect vehicle for your offers, which is also where things start to get interesting.
So let’s dive into Push ads!
What are Push Ads?
Let’s go back to the history books one last time!
If we skip to 2013, when Android 4.2 ICS was released, we start to see a new layer of development within Push Ads.
This was quickly followed up by Apple in 2014 who added interactive buttons that allowed users to send the publisher a response.
Push ads are a natural development of the technology that enabled advertisers to actively promote their offers.
Advertisers could also choose the frequency of an ad and with instantaneous delivery discovered new uses for push technology.
If you think of the end-user of push ads as similar to an email subscribes, it’s easy to see the value in the medium to deliver the type of offer you want to deliver for your campaigns.
Push Ads Advantages
So what makes push ads so special for advertisers?
Push ads have insane performance stats and work for just about any type of campaign.
They also have the advantage that when you send push ads, you’ll only reach real users.
As all users have personally opted-in to receive notifications from services they are genuinely interested in, and you can enjoy high quality traffic to your offers.
They’re also super easy to see on the user’s device, and they don’t have to open an app to see the message which increases the view-ability of your ad.
Want more reach?
With push ads you can target billions of users worldwide, giving you huge reach potential for your campaigns.
How about more customization for your campaigns?
With push ads you can personalize your content with emojis and visuals and choose your delivery times to coincide with time sensitive campaigns.
Push ads can be put to use for a variety of goals in the customer life cycle.
Start testing them out, and you’ll soon discover there’s a lot of other neat ways to use push ads in your campaigns.
Top Verticals to Use with Push
Due to the versatility of the push ads format, they can work well as a tool for different affiliate marketing verticals.
Learn more: Top Mobile Ad Formats and Mobile Ad Sizes
There’s a huge opportunity to promote CPA offers with push marketing.
Having said that, you want to play to the strengths of the format, which are high customer engagement and personalization. Of course, think about how you can get the user to take action with your use of emojis, unique creatives and scintillating ad copy.
So what offers have been killing it lately with push ads on mobile that you can jump into right away?
- Sweepstakes (e.g. win an iPhone)
- Coupons & Vouchers
- Mobile Content Offers (e.g. Antivirus, Apps, Games)
- Dating
- Weight Loss & Nutra
- Finance Offers (e.g. Credit, Loans, Crypto)
- Gambling & Sports Betting
- Video Streaming
- Health & Beauty
Bonus: consider using an ad spy tool.
While these may be your best bet right now for converting offers, that’s not to say push ads can’t work with just about any vertical.
So don’t be afraid to give them a try even if your niche isn’t on the list.
And don’t spread yourself too thin!
While the promise of profits can be enticing, it’s best to get to know your vertical inside and out if you want see the best results from your campaigns.
Right practice makes perfect. So once you get up to speed and start seeing results in one vertical, then you can always branch out into other areas.
On the flip side, you may find that some verticals work for you better than others, which goes back to our point above about testing everything, including the verticals you run.
The Importance Trackers
First, we hardly need to mention it at this stage, but you need to track all your data with a good tracker such as Voluum in order to gather all your important data and correctly track your campaigns
We recommend using Voluum as the preferred tracking platform of choice, to analyze how your ads are performing.
If you don’t have Voluum already, you can use Mobidea’s Voluum coupon to get a special discount.
If you think Voluum is not for you, make sure to check our list of the best trackers.
How to Start a Push Ads Campaign
So now you know all about push ads and how they can be used, it’s time to put this into action!
While the technology behind push ad notifications may appear incredibly complicated, starting your first push ad campaign is surprisingly simple.
In many ways, it’s not unlike creating any other campaign.
You’ll need 4 things:
- an offer
- a prelander (especially for sweepstakes and dating offers)
- a traffic source
- an ad tracker to tie all elements of your campaign together
Pro tip: If you are unsure whether to use a pre-lander for your offer, first check that the offer doesn’t already include a pre-lander, and then depending on the type of offer you are promoting, for example, sweeps and dating, you can then create one yourself and monitor the effect on conversions in your tracking platform.
Or, if you’re just starting out and any of that is unfamiliar to you, grab yourself a coffee and study the articles at Mobidea Academy, where we explain each step of the process in detail to put you on the path to affiliate mastery.
Have a vertical in mind but no offers to run?
At Mobidea, we’ve got offers for months!
Register a new account and, once approved, you’ll be able to choose from some of the hottest mobile offers in the industry.
Next, you’ll want to pick a traffic source where you can buy inventory to run your ads.
As push ads are becoming more popular among affiliates, the places you can buy this ad format are increasing in number.
But fear not!
To help you make a choice, we’ve put together a list of some of the top push ad networks where you can get a flow of high-quality traffic to your offer at attractive CPMs.
Any of the push ad networks mentioned below are solid places to run your push ads.
So start filling in your application right away!
Recommended Traffic Sources
- Propeller Ads (Propeller Ads bonus coupon)
- EvaDav (EvaDav bonus coupon)
- AdMaven (AdMaven coupon)
- MGID (MGID bonus coupon)
- Adcash (Adcash bonus coupon)
- Adsterra (Adsterra bonus coupon)
- RichAds (RichAds coupon)
- Push.House (Push House bonus coupon)
- Clickadu (Clickadu bonus coupon)
- Galaksion (Galaksion bonus coupon)
- Reacheffect (Reacheffect coupon)
- HilltopAds (HilltopAds coupon)
- BidVertiser (BidVertiser bonus coupon)
- RollerAds (RollerAds bonus coupon)
- ClickAdilla (ClickAdilla bonus coupon)
- TwinRed
- TrafficStars (TrafficStars bonus coupon)
- Coinis
- Mobidea Push
Related Content: Ad Networks Reviews
So now you got an offer to run and a place to buy traffic from. Now it’s time to set up your ads.
Precisely how this works is going to depend on which network you are set up with but the basic premise is the same.
If your ad network has more than one format, make sure to select push ads to create a new campaign and select your pricing model.
For the target URL, choose your lander and add any tracking tokens that your source provides to your tracker.
Next, you’ll want to choose your GEOs.
Make sure that these are valid for the offers you want to run or you won’t get paid for your efforts.
Some networks will allow you to further segment your traffic by targeting cities, so you can get really specific with your ads.
You’ll also want to test variations of your creatives. Usually, you need a square icon and a rectangle image, a headline and a description.
It’s always good to test 2-3 variations of your creatives and then renew these every 3-4 days and measure the impact on the campaign performance.
You’ll want to do this more frequently if you have placed a high-frequency cap for your campaign.
You can also you can add dynamic tokens to your creatives, such as city or network to find which segments are working best for your offer.
If you’re using Mobidea or running a mobile-only offer on some other network, make sure to select the right platform and OS for your traffic.
You may also be able to choose the connection type and ISP but it’s usually a good rule of thumb to stick with the default options unless you know what you are doing.
Next, you’re probably going to want to choose your targeting options.
This refers to the quality of the traffic you’ll receive for your ad, based on the engagement rate.
There’s no surprise that the better the traffic quality, the higher the price. So you need to plan beforehand how much volume you want to add your offer, as well as how much you are prepared to pay for it.
If in doubt, leave it at the default settings and let the network’s algorithm work its magic.
You may also be able to include or exclude the zones you target, again depending on the network you belong to.
Another thing to pay attention to is frequency capping.
It’s generally not considered a good thing to show the same ads to the same user in a short space of time.
This can have the effect of decreasing engagement and ultimately lead to more users opting out from notifications.
You can try out a different setting here but it’s better to increase your pool of users than it is to over-saturate the same group by using a high-frequency capping.
Remember when we mentioned you could schedule your push ads for certain times of the day to coincide with events?
Now you can choose your campaign schedule and monitor how it performs at different times of the day.
Next, you’re going to have to set your budget.
This is up to you, but unless you have a well-optimized campaign, it’s advisable to start small and scale up accordingly, once you know which ads are winners.
You’ll typically want to work with CPC for your push campaigns and work towards having a low CPC value with a high CTR.
For small GEOs, you may find the CPC to be as low as $0.004 – $0.005, giving you plenty of data to test your best-performing creatives and offers.
Setting a daily limit and campaign budget is also a good idea.
The network should give you an estimate of your projected reach and total available traffic, based on your targeting options.
Make sure you dedicate plenty of time to this because the push ad user will see when you start running your campaign.
Test multiple variations of your title and description and images and make sure to use the correct format for your push images for the campaign.
Creatives
Creatives are a super important part of the process!
This is the first point of contact between the user and your offers and the way you connect with your users through your creatives can greatly influence the action the user takes later on in the process.
Each of the ads should contain a title, a description, a logo and an image, all of which are important elements to test if you want to create ad campaigns that convert.
You’ll find that images are especially important, probably more so than the ad copy, so pay attention to this and measure the impact of different images on your campaign.
Affiliates will also need to follow the image requirements of the creatives, which may differ between networks.
The use of emojis and creative copy can all add up to increase user engagement with your ad.
Examples of Good Creatives
Example 1: Dating Offer

This dating offer ticks all the right boxes.
Notice the high-quality images and selfie that has all the hallmarks of a social network.
The message is personal and direct, and includes a good use of emojis. Also, the creative has a strong call to action to encourage the user to click the ad: Come Find Me Online!
Example 2: Antivirus Offer

What we like about this creates is that is manages to instil a sense of fear to put the user on guard.
It creates a sense of panic that causes the user to sit up and take notice and the call to action invites him/her to take action immediately.
This example also uses emojis that are relevant to the context of the creative and also help to trigger a reaction in the user.
Examples of Bad Creatives
Example 1: Dating Offer
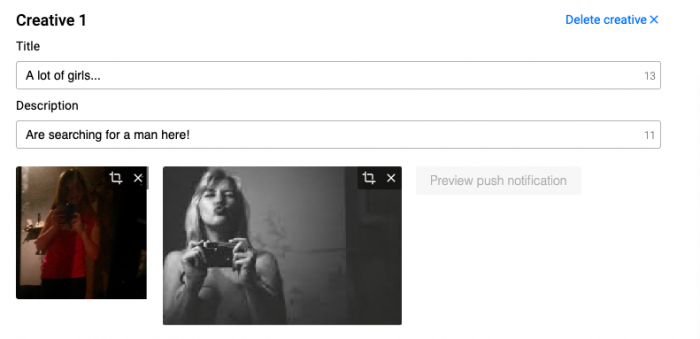
The image quality in this ad is low with dark lighting and poor resolution
On a smartphone the image will look even less crisp, so it won’t be attractive to the user which will result in a lower CTR.
The text also fails to engage with the user and is fairly generic in content. The approach is impersonal and there is no clear call to action to direct the user to click the ad.
Example 2: Antivirus Offer
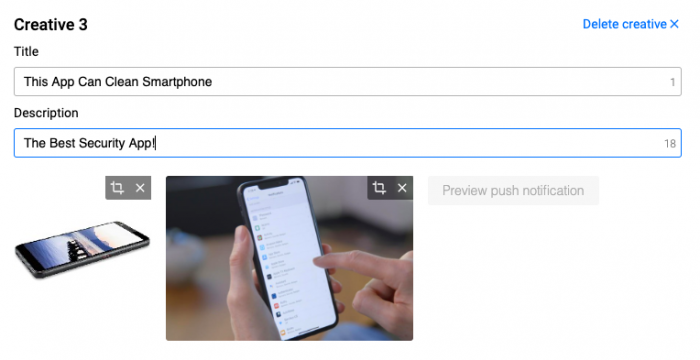
This ad falls into the bad category because the visuals are not relevant to the context of the ad.
They appear too generic and fail to grab the users attention.
The ad copy fails to address the user directly and the lack of a clear call to action doesn’t invite the user to click the ad. As a result, the CTR will, most likely, be very low.
Optimization Tips
Now that you know what verticals you’re going to promote with your push ads and how to create your first campaign, it’s time to look at how you can turn your campaign into a profit-making machine.
Tip #1: Offer testing – Test Different Offers for every campaign your run. When in the same vertical, different offers can have different flows and this will affect the payout and performance.
Tip #2: Creatives – Test multiple variations of the creatives and ad copy, and remember to pay attention to the quality of the ad, as well as the network requirements to make sure that you are always following the guidelines of the network. Don’t forget to make use of power words and emojis which will increase your CTR.
Tip #3: Whitelist Campaigns – With enough test data you’ll begin to see which traffic sources and audience lists are performing best for your campaign. Typically, affiliates will block these sources to focus on the higher-performing ones.
However, a neat way to manage this is to whitelist the best performing campaigns. Start by identifying your top-performing traffic sources and segments and then add these as whitelisted sources to your campaign. With a whitelist campaign, you simply select your top-performing sources and continue to optimize as new sources are added.
Tip #4: Freshness of the Users/Subscribers – Try creating two (or three, depending on the network) campaigns, one to target fresh users and another to target those users who subscribed more than 7 days ago. Compare the ROI between the two campaigns.
For instance, your results may find that users who subscribed less than 7 days ago will have a higher CTR than those who subscribed 7-21 days ago, and users who subscribed more than 21 days ago will typically have a low CTR value.
However, if you are working with CPC your CTR doesn’t impact the ROI, so you can take advantage of the cheaper traffic for older users and you find yourself interested by the results. In some cases, the user groups with subscribers older than 21 days can have a better ROI than the group with fresh users..
While we know that push ads have some of the best engagement rates, CTRs and conversion stats in the industry, this doesn’t mean you can simply create your campaign and forget it.
Push ads offer a high level of customization and user engagement, but it’s up to you to exploit those qualities to create a winning campaign.
So you’re going to need to look for opportunities where you can optimize your push ads to make sure your offers convert.
Conclusion
You should always be looking to switch things up and never get too comfortable with your campaigns, that’s if you wanna stay ahead of the competition.
Push is the new Pop.
It will make you rich if you keep in mind that you need to renew your creatives (also landers and offers) frequently.
This can be as often as 2-3 times a week, depending on your frequency capping.
Make sure not to over expose your users.
Remember that you are shooting your ad on database of users and not buying inventory from a publisher.
It’s a challenging process, but one that can be very rewarding.
You can also test your landers by having multiple page variations and making sure you include appropriate calls to action on each page.
Push ads are all about personalization. So make sure you use time-based targeting, along with the frequency of the ads shown, as well as the content used, to create super targeted, high converting push ad campaigns.
And that’s it, good luck!
See also:


The most thorough affiliate marketing verticals guide! Check the best verticals and actionable golden tips (yes, absolutely!)

Sweepstake offers are a killer way to increase your affiliate marketing profits so learn how to make it work with Charles Ngo, a super affiliate!

Want to understand why you should become interested in mobile Media Buying? Wait no more and read all about it in the Mobidea Academy!