How to Create a Killer Mobile Campaign on ExoClick
Last updated on May 16, 2018 by Dmytro Butuzov 9 min readTable of Contents
ToggleA New ExoClick Campaign
Hey, everyone!
I’m sure you already know about ExoClick, one of the best ad networks in the industry where there’s a whole lotta saucy cash to be made!
Now, I wanna show you how to create your first ExoClick campaign and start making money like it ain’t funny!
I’ll create a new campaign in Argentina.
I’ve checked, and found that the carrier with the best eCPM is Personal.
Therefore, I want my campaign to target only this cool carrier.
After I click on the top menu button “New Campaign”, I see the following page:
- In the first line, you insert your campaign’s name. In this particular case, I’ve launched a very general campaign. Its name? Argentina – Personal.
- Since I’m gonna promote an adult offer, I chose the Adult category as my traffic source.
Tip: you can write whichever name you want. Nonetheless, remember that – the more campaigns you create – the harder it’s gonna be for you to organize yourself.
The only way to not get totally lost? Give a very detailed and structured name to each campaign.
Try to include all targeting specifications that distinguish that particular campaign from others in the name.
It may also save you time.
Imagine you target only one website, one browser and one language: you see it on the campaign’s name and simply skip these sections while checking the stats. Easy!
- There are many possible ad formats worth your attention. I want my campaign to be displayed at the spot of 300×250 since it’s got the highest volume of impressions.
- In the “Countries” section, I select Argentina as my target. To do so, I simply find Argentina in the left column and move it to the “Selected Countries.”
Campaigns – Time for Tips
Super Tip #1
Always test different ad formats.
Even though 300×250 has the biggest volumes, it’s also the most competitive spot, so I wouldn’t suggest you start with it.
The second biggest spot is 300×100 and it’s easier to get profitable with it.
Remember, though: you’ve gotta try different spots.
You can go for spots such as the Popunder, 468×90, 728×90, or Instant Message, etc.
Trust me:
All these spots are gonna have potential and can be super profitable.
Super Tip #2
If you’ve already made a profitable campaign, launch other spots to scale up your traffic and therefore your revenue.
Even so, don’t expect the same targeting and websites to work for other spots.
In fact, it can be the complete opposite.
That’s why it’s better to always test everything for each campaign.
Super Tip #3
When you’re thinking about which country to go for, think wisely!
There are many options, alright!
However, not all will be a good choice for media buyers and some of them are just not for beginners at all.
I advise you to start with African or Latin American countries, as they have a good conversion rate and the traffic is quite cheap.
In case you’re struggling with your options and don’t know where you should start, we’re always here to help you!
Get in touch with the Support Squad by sending an email to support@mobidea.com
We’re here to suggest the best countries according to your affiliate marketing needs!
With our help, you’ll be able to create an ExoClick campaign that makes it rain!
Back in the Game
At the right side of the page, you can see a potential amount of daily impressions for your targeting.
After you run your campaign for at least one day, you’ll be able to see how many impressions you’ve got, showcased in absolute and percentage values.
The estimated traffic adjusts according to your targeting (Country, Operator, Devices, etc.)
It also adjusts in case you create the Premium campaign and choose only specific website zones.
The only discrepancy appears if you Whitelist or Blacklist websites, or if you have a Premium campaign.
In this specific case, ExoClick doesn’t adjust your campaign’s estimated traffic.
From the percentage of traffic you’ve got, it’s possible to understand your position.
For example, in case you receive 3% of the traffic, it means you’re definitely not in the first place, but rather on 3rd or 4th.
If you have 10% or higher of the total traffic, you’re most likely in first place.
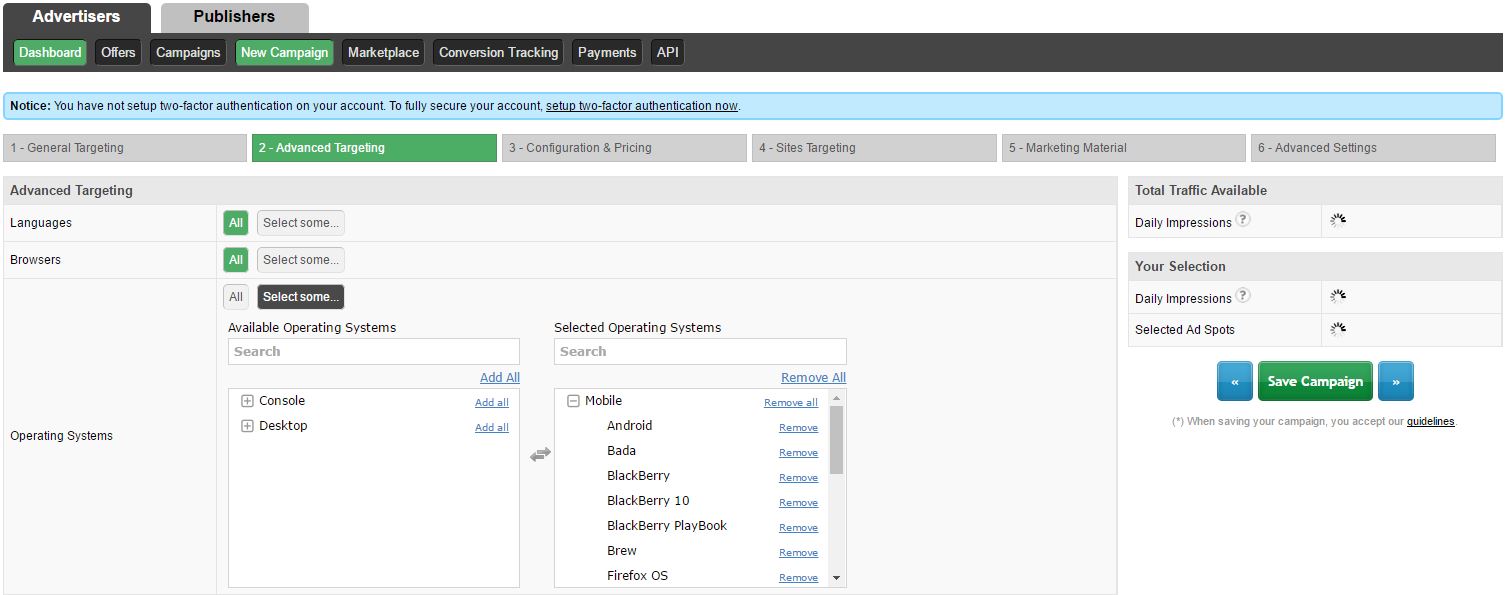
Now, I’m gonna show you the next tab for you to check more Advanced Targeting options.
This is crucial for you to make that brass with class on an ExoClick campaign!
- Here, I can target the Languages of the devices. I’m gonna keep all Languages, though. I’m also gonna maintain all the Browsers, because I don’t know which are good and which are bad, which means I wanna test them all.
- In Operating System targeting, I’ll select all mobile operating systems. I don’t wanna have Desktop or Console traffic because my offer is a subscription and works better for Mobile Phones and Tablets. In many cases, iOS performs poorly. Even so, I’m not sure of the outcome, so I prefer testing it to make sure I ain’t missing any opportunities!
- By scrolling down, I see Mobile Carrier selection and choose Argentina Personal.
If you can’t find the carrier you’re looking for, don’t worry! The names of carriers may vary in different traffic sources. In this case, try to Google the carrier and its alternative name, or just ask the Mobidea Crew and they’ll help you in no time!
- When it comes to targeting by Devices, I’m gonna select all Mobile Phones and all Tablets. I don’t wanna target neither Desktop nor SmartTV traffic, so I leave them in the left column.
Now, I’ll go to the next tab which is Configuration & Pricing. Pay attention so you can rule like a king and master the art of creating a campaign on ExoClick!
- First of all, I’ll change the pricing model to SmartCPM. Why SmartCPM? Because it’s the most efficient pricing model! Instead of paying a fixed price you pay just 10% above the competitor below you.
The Premium Factor
When should you use CPC?
Honestly, the only situation I can think of in which the Cost per Click model would be more profitable is when you’ve got a very low CTR, even though your conversion rate is great, or when you’ve got an angle/segmentation/flow that’s focused on CR and not on the number of clicks you bring to the pre-lander.
- Then, I’ll enable Frequency Capping and keep it with the value of 1. What’s Frequency Capping? It’s the number of times your ad will be displayed to any particular user. Therefore, if a user already saw your ad, regardless of whether they’ve ignored it, clicked or subscribed, it’s less likely that they’ll interact with it while seeing it for a second time in a row.
- I’ll set an average bid of 0.4. Later, I’ll check whether I should decrease or increase it. Alternatively, you can apply other bidding strategies. A possible strategy is to be aggressive and put a high bid (let’s say 2, in this case) then check how much you pay for different targets/websites and decrease it if it isn’t profitable. Another option is to start from the lowest bid and gradually increase it throughout, cutting everything that isn’t working.
- I select a maximum daily budget of 100 euros, just to protect myself from unexpected changes.
- In the Ad Group line, I select a group where I want my campaign to be listed. I place it in the Argentina group so as to better organize my campaigns. If you click on Manage Groups, you’ll be redirected to the page where you can create/delete/rename groups.
Campaign Creation – Sections
The next tab of this ExoClick campaign is gonna be Site Targeting. By using this section, you can create Premium campaigns.
If you tick on the option Premium, you won’t be able to select specific zones of the websites that you find extremely profitable.
Now, I’m gonna create a RON (Run Of Network) campaign so I won’t touch anything here and move forward.
A RON type of campaign basically means you’ll target all the network’s websites for this targeting (country, operator, ad format, device, etc.)
In general, Premium Campaigns are created when you’ve got some amazing zones and wanna create a campaign just for those special money-making machines!
In the tab Marketing Materials, I’ll insert my offer’s URL, which is a Smartlink of the Adult vertical.
You can also click on Manage Offers and create an Offer.
When you’ve got an offer, you can just select it from the dropdown menu for any campaign.
It’s handy, especially when you work with the Smartlink or launch many campaigns for one offer.
Then, I’m gonna upload some banners that’ll be displayed in my campaign on ExoClick.
I’ll test three banners and stop or replace some of them based on their performance later on (depending on how things go).
In fact, you can upload as many banners as you want.
From my experience, though, the optimal amount is 3-4 banners.
With more banners, it’ll be harder to collect enough data to see which banners are better and which are rotten.
1/2 banners?
That’s simply not enough since you should test different creatives in order to find the best-performing ones.
Getting Closer
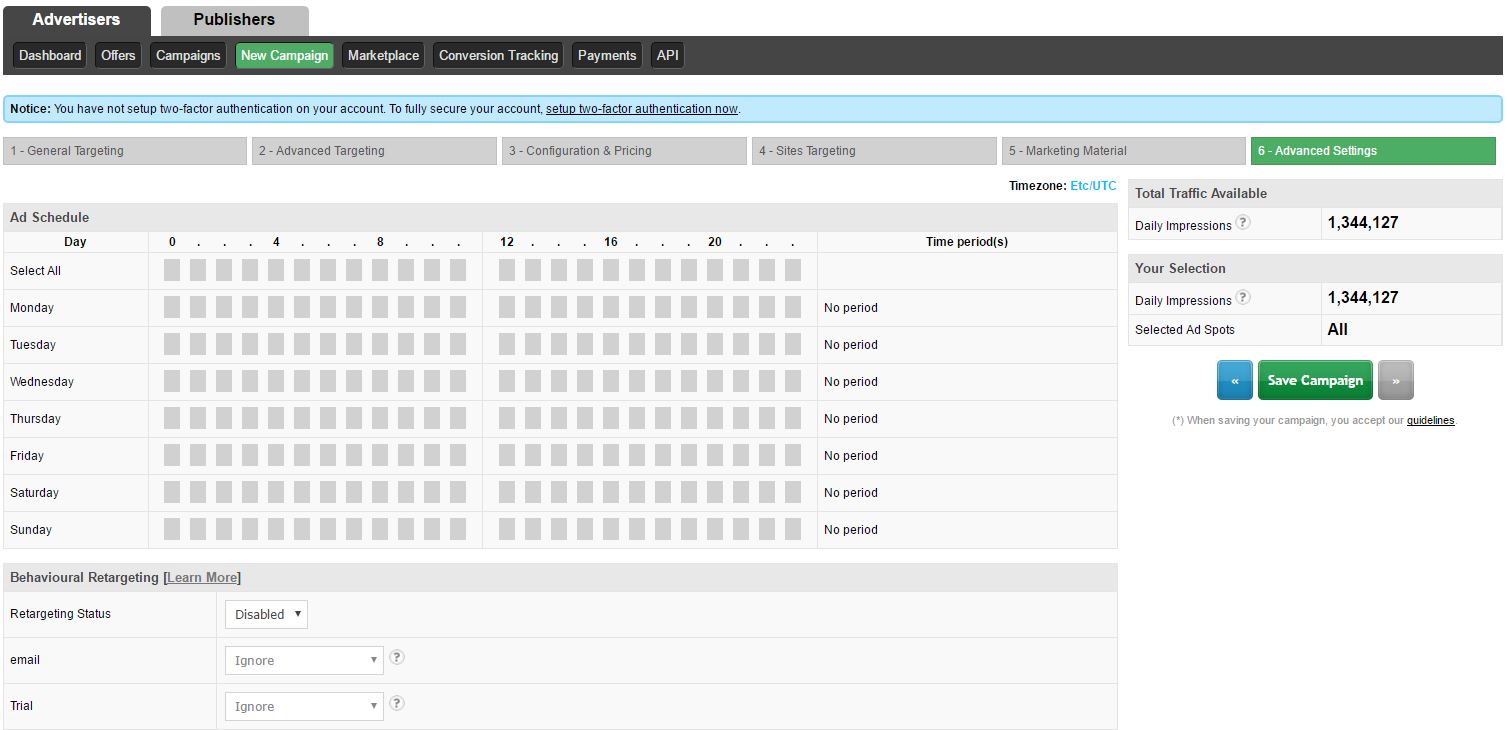
In the last tab – named Advanced Settings – you can find additional targeting tools. Our ExoClick campaign is almost ready!
- The first tool is Dayparting. Here, you can select the hours in which your campaign will be active.
After collecting the data, you can check the stats per hour. Maybe some of them perform worse and some better so you can stick to those which have the best performance.
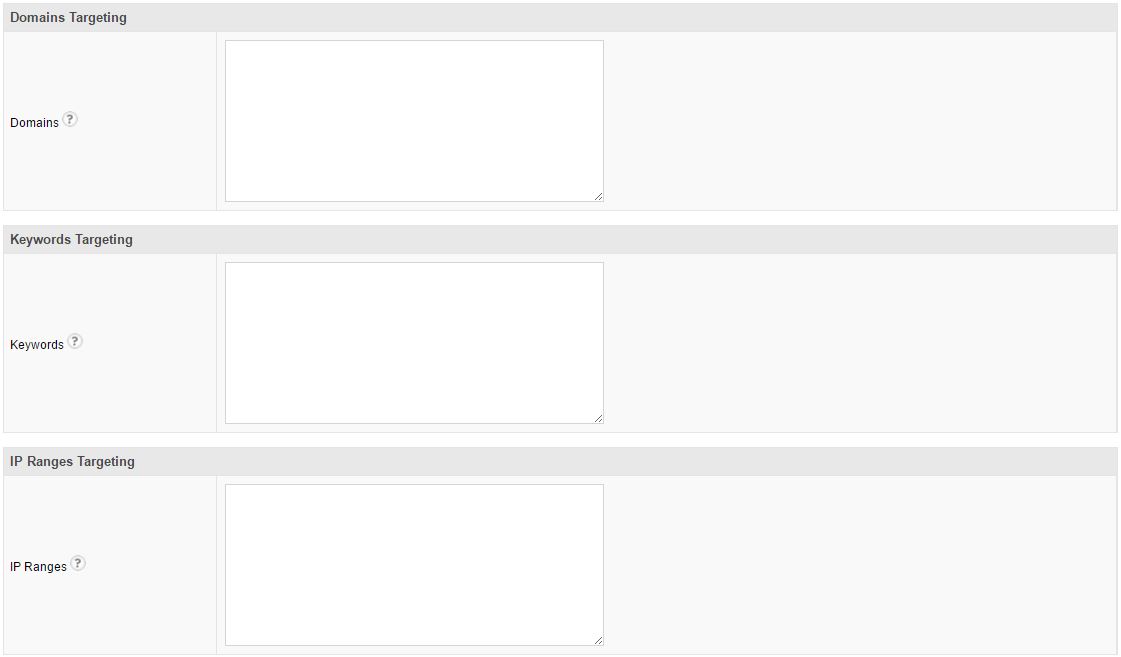
- By scrolling down, you’ll find Domain Targeting, where you can create a Whitelist/Blacklist.
ExoClick Campaign Creation – The Final Touch
To add a Website to a whitelist, type the name of the website you wanna cut.
On the other hand, to add a Website to a blacklist, type minus (-) and the name of the website you wanna cut.
- The next useful tool is the targeting of IP ranges. With this tool, you can target only users from certain IPs. It’s also possible to blacklist IP addresses by adding minus (-) before the IP in the same way as with Domains. In my case, I wanna target the whole Personal operator, so I’ll leave it empty.
Note: per line, ExoClick allows you to add one particular IP address or CIDR (which consists of many single IPs).
What’s the maximum number of lines? 100.
At the end, you need to click the Save Campaign button.
What? Is that it?
Hell yeah!
We’ve just created a new campaign on ExoClick in a few minutes!
Loved this ExoClick Campaign Walkthrough?
Ask the questions you’re eager to learn from!

Dmytro Butuzov
Online Analyst
Dmytro was lucky enough to come to Lisbon for his studies. That's how he ended up having not one but two Master degrees: one is in Marketing and the other one in Finance. With such a phenomenal background, it was only a matter of time until the Mobidea Crew convinced him to join in and become a true pro! He now works as an Online Analyst on Mobidea, and he is simply an amazing professional who also loves writing super helpful affiliate marketing articles. When he isn't working, Dima loves exploring Lisbon's cultural life and having fun!
Want a step-by-step case guide to optimize campaigns on ExoClick? Check it out now and start earning a whole lotta money on ExoClick!
The most thorough affiliate marketing verticals guide! Check the best verticals and actionable golden tips (yes, absolutely!)
This is the last installment of our 5-part media buying mistakes series so it's time to read and hone your affiliate marketing skills!


