Table of Contents
ToggleEditor’s note: Go2mobi is no longer available.
Introduction
Following our last ad network review, we now present you a brand-new review of one of the major players in the DSP Advertising world – Go2mobi!
If you didn’t read our article about the nature and service of Demand-Side Platforms (DSPs) yet, now’s the time to do it!
In this article, we’ll begin by giving you an overview of the platform and its features.
Afterwards, we’ll describe the campaign creation process, as well as the reporting and optimization possibilities.
After reading this article, you’ll have a detailed overview of the platform and all the tools in hand to start your first campaign there!
Go2mobi Overview
As briefly mentioned above, Go2mobi is a Demand Side Platform (DSP), providing you traffic from 12 different ad exchanges – the biggest being MoPub, Smaato and Nexage.
The majority of traffic coming from those 3 ad exchanges is in-app.
Moreover, Smaato and Nexage also have some considerable mobile web traffic.
The ad formats you can find on Go2mobi include mobile display banners, video, rich media and native ad traffic.
This already suggests that the ‘classical’ promotion of sweepstakes and antivirus offers (which tend to work best with pop traffic and aggressive landers) won’t be the main focus on this platform.
In fact, it’s really more about games, apps and other mobile content offers.
Go2mobi is a self-serve mobile programmatic DSP.
However, if you’re among the big spenders with a daily ad spend of $1,000 and you have your campaigns live for at least two weeks in a row, you might be upgraded to a managed account.
This basically means you’ll have a dedicated account manager who’ll manage, monitor and optimize your campaigns for you based on their performance.
A managed account also provides you some useful exclusive features like demographic targeting, which can help you step up your game to a whole new master level!
Before getting to such a level, however, let’s first check how to get you started!
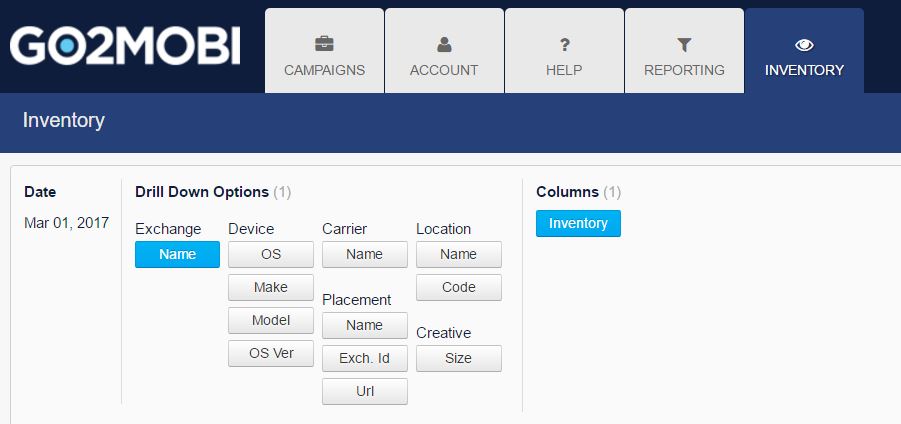
In order to get a good feel for the volumes available on the various ad exchanges before launching your campaign, you can check Go2mobi’s detailed “Inventory” section.
There, you’ll find info about the volumes of each ad exchange, becoming able to drill it down to device-related info such as OS or device brand (‘Make’), carrier, placements, location, and size of creatives.
If you plan to launch a campaign for an offer in Nigeria, for example, you simply click on “Exchange Name” and “Location Name”, put “Location Country” in the filter and then write “Nigeria” in the blank space. You’ll see how much traffic each exchange has in this GEO.
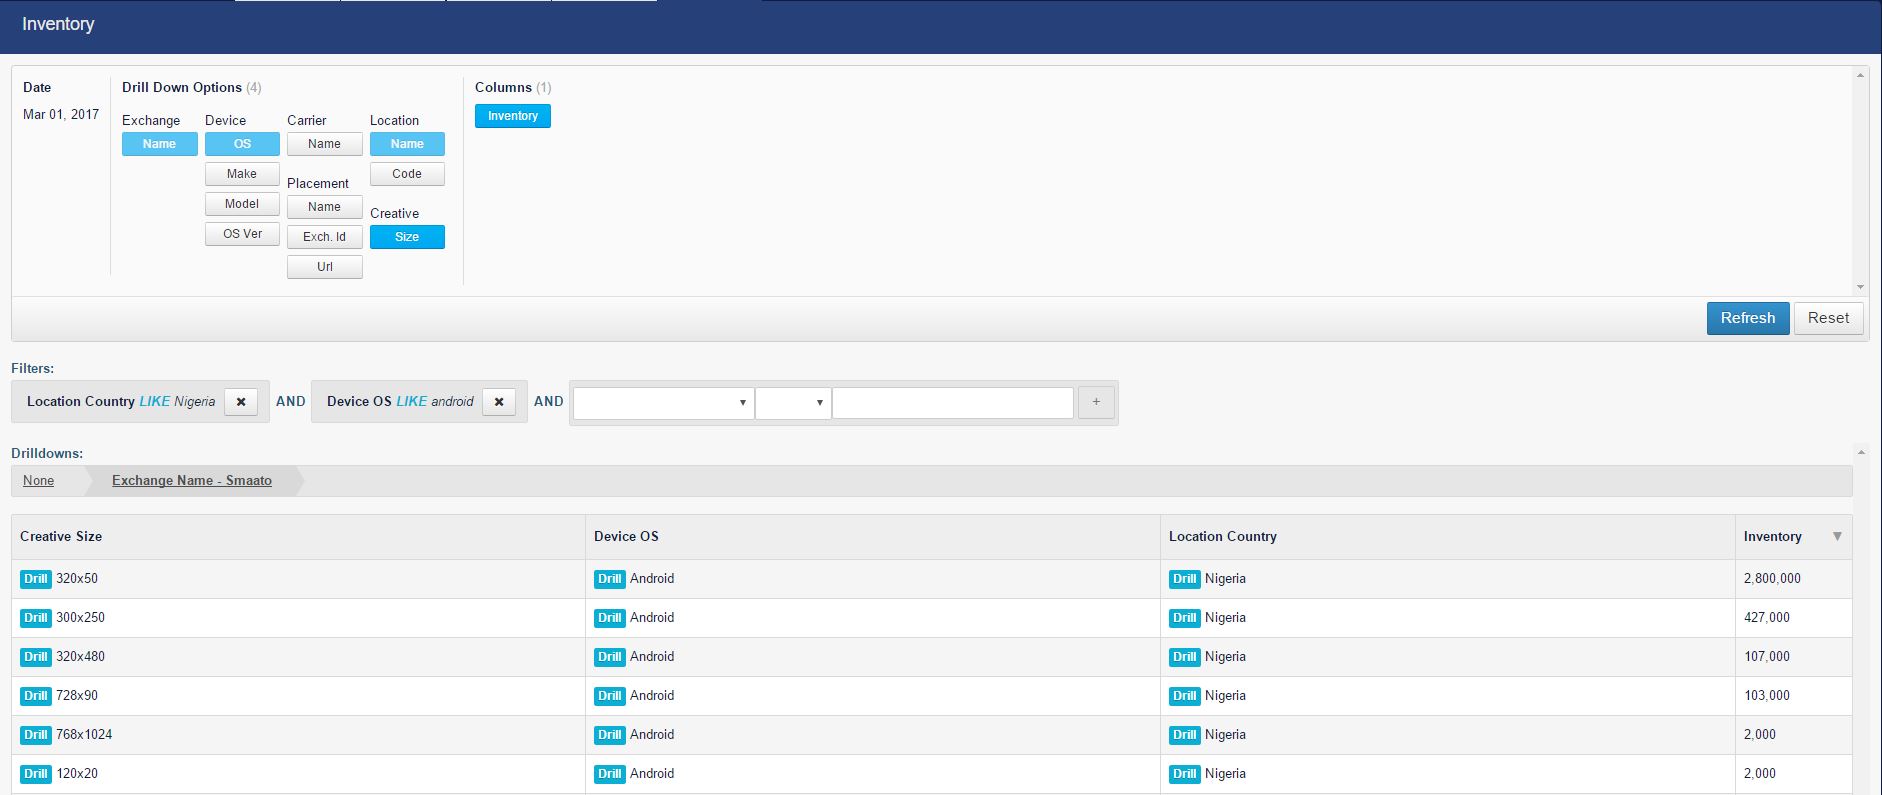
Then, of course you can go deeper – if your offer is only available for Android, you might want to add another filter for “Device OS LIKE Android” and check the volumes per ad exchange.
From there, you can choose to “Drill” into a specific exchange (e.g. Smaato in the screenshot below) and select “Creative Size” in the Drilling Options in order to see the volumes of each ad size in Smaato for Android in Nigeria.
You’ll see all your chosen “Drilldowns” in the space between the filters and your results and can easily navigate between the several levels of your ‘drilling’.
In total, the most popular and highest volume ad sizes on Go2mobi are 320×50, 300×250 and 320×480.
However, this will obviously vary among the several exchanges and also per geo. In their biggest volume exchange, MoPub, you can also add native ads to this list, as it’s their second largest volume format (on Go2mobi, native ads show up as “0x0”).
At the beginning, it might take a bit of time and of playing with the system to fully understand the best way to get the info you need, as the use of the filters vs. drill downs can be a bit confusing.
In the end, however, it’s a pretty straightforward and detailed tool to give you a lot of insight about the potential traffic volume before starting a campaign.
In addition to the “Inventory” section, you should also check the Go2Mobi Knowledge Center before launching your first campaign.
It contains a lot of useful info about the average CPMs for the top ad formats on three top ad exchanges, their campaign and creatives policy, other useful guidelines (with videos), tips about campaign creation, and your account details.
Conversion Tracking
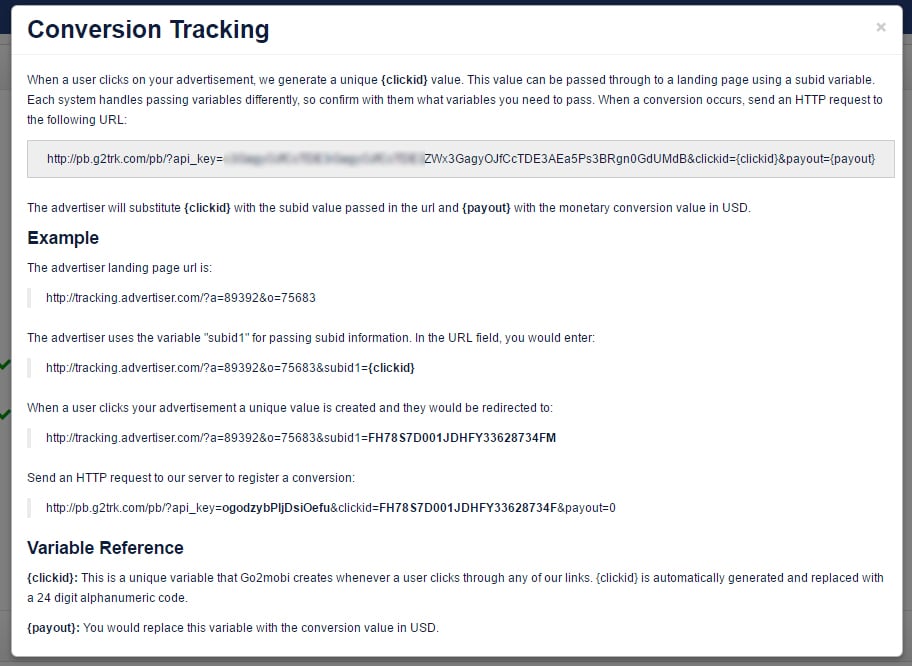
Before launching the campaign, you wanna make sure you’ve got your tracker configured with Go2mobi’s Global Postback. To do so, go to the “Account” tab and on the bottom of the page where you see “Postback Link – Conversion Tracking”.
If you click, a small box will appear containing your Global Postback link + an explanation of how to set it up:
On the most common trackers – let’s suppose it’s Voluum – you’ve already got a template for Go2mobi.
This template will load some of the tokens available, plus a random Postback link which should be changed by the one you get in the process we’ve explained above.
By default, the postback will be done via HTTP and it’ll replace your {clickid} token by a 24 digit code, which will allow you to identify the conversions.
Campaign Creation
Moving on to the campaign creation process, we start with the Destination URL.
Here, you can insert the offer link (with a special mention for the conversion tracking tokens available) or your tracking platform’s campaign URL.
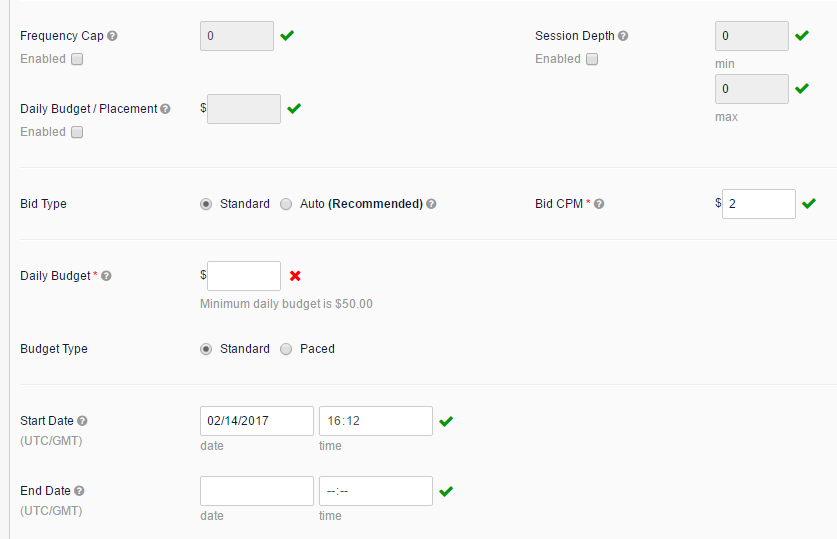
Among many options, you’ve got your standard parameters available, such as Frequency Capping, Daily Budget per Placement, plus other budget options.
Session Depth will define when a user will see your ad: the first ad that’s ever displayed to a user is Session 1 and the 10th ad displayed to that user is, for example, Session 10.
To finish, “Date selection” and “Save” to activate the campaign.
What about bidding?
You’ve got two options: Standard CPM or Auto bidding. On the Standard bidding model, you’ll bid based on the CPM you’re willing to pay. However, the CPM you select isn’t fixed.
Meaning?
That – when you win an impression – you’ll pay based on a “second auction” system.
This means you won’t pay your bid. You’ll pay the bid of the bidder right below you on the rankings, instead.
The “second auction” system also applies when you select “Auto Bid Type”.
In this case, Go2mobi’s bid system dynamically distributes bids and fights for traffic on all the campaign’s parameters and combinations, without overpaying for lower value impressions.
It’s targeting a Win Rate of approximately 40%, which is considered to be a good level to get a feel for the quality of a certain parameter.
The goal of the auto-bidding?
To get inventory at the lowest cost across all traffic combinations.
While using this tool, it’s normal for you to see a bid of 1.5 in a placement and – on the next one – a bid of 21.
This CPM value varies and depends on the bid required to get a Win Rate of at least close to 40% and on the bid floor (minimum bid) to buy traffic from that specific placement.
Auto-bidding can be a good way for you to understand the quality of traffic.
Once you get a feel for the quality of the individual parameters and combinations, though, you should definitely make use of the bid-overrides and switch to manual bidding (more about this in the last part of Reporting.)
After selecting your daily budget, you can also set your budget as “standard” or “paced.”
The paced budget is an interesting feature that allows you to target a certain number of Wins or Conversions per day.
After finishing this first setup, you’ll see a “save” button.
This “save” button appears multiple times on the “edit campaign” page which means you must save each section to save the whole campaign.
This can be quite tricky, because you can easily forget to save something.
In fact, it’d be useful to have a button which allows you to save everything at once.
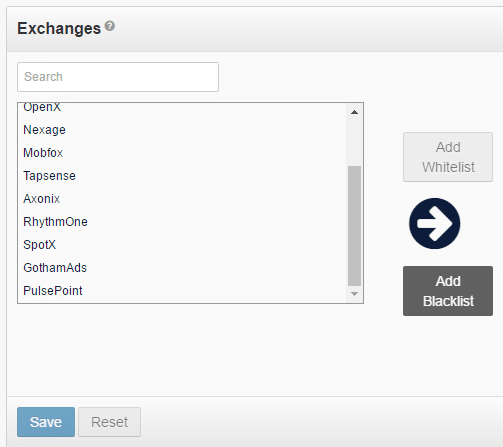
The next step would be selecting the Exchange to buy the traffic.
There are 12 options available but – before recommending any of those – we advise you to check the “Inventory” menu to understand what’s the available traffic for the specific GEO you wanna launch.
After checking the traffic, you can select as many GEOs as you want by adding them to a Whitelist.
While selecting multiple exchanges, it might happen that your campaign is accepted and rejected on some of those traffic sources.
This happens because of the different rules when it comes to the type of offer you’re promoting.
You can check an example of the type of offers being promoted and the type of traffic available inside each exchange.
Plus: by simply leaving the Safety Fallback option switched ON in Mobidea, you can get rejected on some of the exchanges (mostly MoPub and Smaato).
They like to know what you’ll be promoting and whether or not there’s another kind of redirection involved in your campaign.
What to do?
Make sure you get your campaigns approved by those exchanges.
Indeed, we advise you to turn off your Safety Fallback.
BEWARE! In this case, you must always check the availability status of your promoted offer, as you don’t have any fallback option in case the offer is paused!
Note that the approval stage can take a while, as you’ll be processed according to your submission time.
Approvals only take place between 09:00 and 17:00 PST.
Looking to be more effective, we’re now gonna list the targeting options and respective brief explanations.
Carriers – Go2mobi allows you to target everything specifically: Wi-Fi, 3G and 3G + Wi-Fi. When it comes to Carrier targeting, you won’t have a worry in the world!
Placement Type – option to filter traffic by App & Site, Site or in-App only.
Placement – where you can whitelist or blacklist a given website.
Auto Rules – allows you to create conditions and rules that’ll make the campaign self-optimized, based on certain parameters.
Device Type – easily allows you to target Phone or Tablet traffic.
Devices – where you can whitelist/blacklist OS, OS version, Device Make and Model.
Creatives – the place to upload banners and finally select the traffic dimensions you’ll target.
Hint: be aware that you can also adjust the weight for each uploaded banner, according to your requirements. By default, it’s gonna be 100% per banner.
Besides these main options, Go2mobi has other features such as Dayparting, GEO location (allows you to target specific areas such as cities and ZIP codes), IP addresses, note box (where you can take notes) and a Rules tab to manage the optimization rules that you set up on the campaign.
To finish, the Bid Overrides option allows you to select a different CPM bid for a specific parameter of a campaign.
Campaign Tracking/Reporting
One of the great features on Go2mobi is the platform’s detailed granular reporting.
If you’ve browsed through the Inventory section before launching your campaign (as we’ve told you to do), the “Reporting” section will look very familiar to you.
It gives you an easy-to-navigate panel to pick the date range you wanna look at, “Drill Down Options” to decide which parameters you wanna analyze, as well as all the necessary KPIs (Columns) to really understand the performance of each selected parameter.
The KPIs are all self-explanatory. In case you’ve never worked on a DSP before, ‘Bids’ are all the impressions you were bidding for, ‘Wins’ are the actual impressions you got, which is also displayed as a Ratio, at the end (Win Rate – WR%).
Other than that, you’ll basically find all the most common and necessary KPIs such as the CTR%, CPM, CPA, eCPM, Cost and Profit. By default, your results will be sorted by Wins.
You can sort the data by any KPI you like, though.
Let’s say you start by analyzing the overall performance of the ad exchanges you’ve launched your campaign in.
What to do next?
You can drill down into one of them (by clicking the “Drill” button next to it, as you’ve been able to gather from the “Inventory”) and select other parameters such as individual placements in the list above.
Next to the chosen KPIs of each parameter, you’ll see two other columns:
Actions: you can whitelist or blacklist the respective parameter based on its performance, as well as set a bid override for this particular line.
If you find a placement that’s hugely profitable but you only get a relatively low Win Rate, you may wanna set a bid override for this placement so as to increase your volume and performance.
Status: you can see which blacklist or whitelist rules apply for the chosen parameter (R) and if any override rules exist (O).
On the example screenshot above, a whitelist rule for Android was created. You’ll see a summary of all your blacklists, whitelists and override rules in your general campaign settings.
One serious flaw we’ve noticed in the reporting is this: you’re not able to see the blacklists/whitelists per parameter, once you drill down into a specific ad exchange.
On the screenshot above, e.g., if you’d first drill down into Smaato as one of your target exchanges and then choose to display the stats by OS, there’ll be no way for you to know that Android was chosen as a whitelist.
This can be quite confusing. Moreover, it makes analyzing a campaign per ad exchange something more difficult than it should be!
Another note: in order to properly analyze or compare your data with your tracker or affiliate network, you should bear in mind that the reports on Go2mobi are based on UTC standard time zone (GMT).
Currently, it’s not possible for you to change this time zone.
If you’re looking for practical tips on how to start optimizing campaigns on Go2mobi, you can find some useful videos and rules of thumb in their Knowledge Center.
Even so, in the end, it all comes down to testing, having some of that good-old common sense, and finding your own strategy for each individual campaign!
Offers & Verticals
Ad Types: Mobile display banners, video, rich media, and native
Cost model: CPM
Verticals: Mainstream
Payment & Investment
Minimum deposit: $100 for credit card payments; $1,000 for bank transfers
Payment methods: Credit card and wire transfers
Support
Personal Account manager: none
Response speed: varies. Sometimes within a few hours, sometimes longer than 24h
Support rating: good. Detailed answers, even though sometimes it’s gonna take a while for them to reply
Contact methods: contact form on Go2mobi’s platform and also via email
Contact: support@go2mobi.com
The Verdict
Go2mobi offers a vast variety of traffic in different exchanges and different formats. This means it’s hard to provide a super general judgement in terms of the traffic quality provided.
On this DSP, the percentage of in-app traffic vs. mobile web traffic is very high (99% in their biggest exchange) and the United States makes up for more than a third of their overall traffic.
The total traffic volume is so huge, though, that this doesn’t mean that there isn’t enough traffic available in other GEOs.
Overall, it seems that Go2mobi appeals to a more ‘professional’ and branded side of mobile marketing and user acquisition.
At this point, we wanna emphasize the importance of matching your offer to the available traffic and targeting options.
Make good use of Go2mobi’s inventory tool as well as of the info provided in the Knowledge Center about the types of offers promoted on each exchange to make sure you don’t get lost or lose unnecessary budget.
It’ll definitely require a lot of research and testing but, with the right strategy, you’ll be able to make brass with super smooth class!
We hope this article helped you get a good first impression on how to conquer this huge traffic source!
We’re more than happy to read your views on the comment section below!
Cheers!

André joined Mobidea in February 2016 and started working as a full-time Media Buyer. He specialized in LATAM traffic and focused on managing and creating largely profitable campaigns in various ad networks. At the moment, he's focused on helping his affiliates reaching their goals with his insights and expertise. Apart from loving to work at Mobidea, André really likes to travel, to spend time in the mountain riding his bicycle and he loves exploring Portugal's natural hidden spots.
ExoClick is one of the top adult ad networks where you can get awesome traffic! Read our ExoClick review and find out why!
This fantastic PropellerAds review is gonna show you how to explore a network that's remarkably famous for its pop traffic!
This Adf.ly Review is gonna show you how to effectively earn money on this original and super awesome URL shortening tool!

